Pattern Review: A Sparkly Baby’s Easy Peasy Crossover Dress
With a full time job outside of the home, time is very precious. So sewing is my outlet and my stress relief, which is part of why I maintain Red Dog Studio, but I also find much joy in creating for my own children when I can find the time. So hit me up with a pattern that has “Easy Peasy” in the title and I’m on it like a moth to a flame. Bees to honey. You get the idea.
This is the first A Sparkly Baby pattern I have tried and what’s fun about new designers in my trove of patterns is the possibility of learning new techniques. I love it when a designer puts a tutorial in their patterns and A Sparkly Baby does it with the Easy Peasy Crossover Dress. I will admit, the more I sew the more I have a tendency to construct garments in my own way, but this pattern is absolutely fantastic for a beginner seamstress. Starting with the easy to assemble pattern all the way through to the step by step instructions which includes a how-to for doing rolled hems with not only a serger (which is easy to do) but with a sewing machine! I never knew how to do them with a sewing machine.
Hey! Wonderful news, I was given a coupon code for you wonderful readers to use code and store link at bottom of post.
Pattern Description
I feel silly for saying this but I didn’t quite realize the many options given in the pattern until I opened up the instructions. I mean, it says it on the listing for Pete’s sake. The pattern starts at the Preemie size and runs through girls size 14. The “base pattern” starts with the cross-over bodice and then…(I have added emphasis to the options I chose to sew)
Let’s start with the skirt options:
- A-line
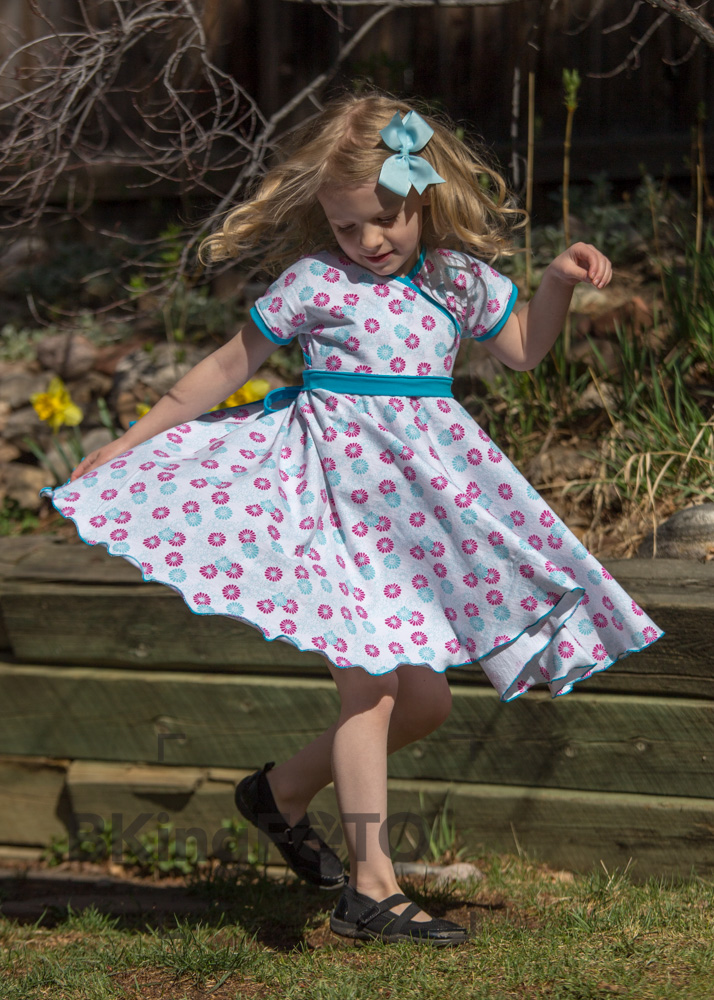
- Circle Skirt (for those girls who like to twirl) – it’s not on the pattern piece but I bet you could shorten the circle skirt and you’ve got yourself a cross-over peplum
- Petal Style (great scrap buster for those weird, long pieces you have left over)
- Gown style for the Preemie, NB, and 0-3 month sizes
Sleeves:
- Long Sleeve
- Short Sleeve
- Cuffed
- Hemmed
- Optional Mitts on the sleeves for the Preemie, NB, and 0-3 month sizes
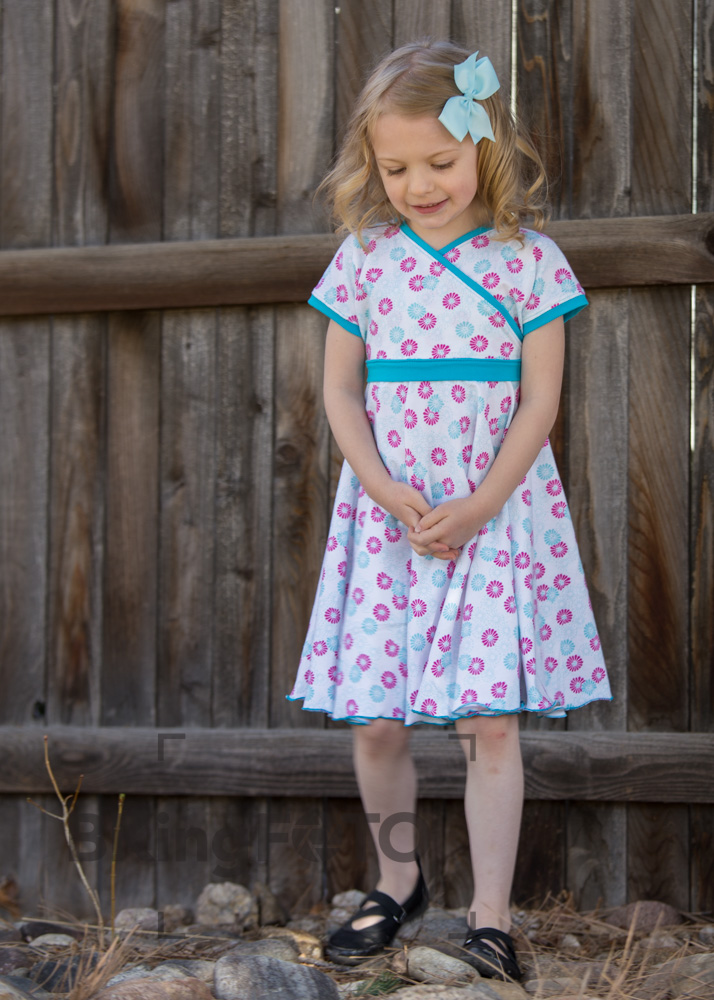
Length-wise the A-line skirt option allows you also make the bodice a tunic-length shirt. In addition to ALL THAT (!) add pockets on the A-line skirt for a fun, fresh look. But wait! There’s more! There’s also instructions on how to add a sash that ties in the back. Yeah. That’s what I made and holy smokes it’s adorable.
Pattern Set-Up & Instructions
I’m going to start off by saying these were probably the most fun instructions I’ve read. There are funny, little snippets scattered throughout the pattern. Getting to the heart of the matter here, probably the best feature of the pattern is the layer feature. What I’m referring to is the linework for each size on the actual pattern pieces has its own layer. For example, if you are just sewing for your one child, you can turn off all the other sizes but hers. So there isn’t a jumble of lines for 10 other sizes and you know exactly what pages to print and no more.
There is a wonderful wealth of information at the beginning of the pattern, complete with a table of contents which the organizational freak inside me swoons over, that covers everything from sizing measurements (the child’s sizes, not finished sizes which I always like), to fabric requirements, best fabric choices, how to print and assemble the pattern, and more. The pattern is nicely indexed given there are so many options to sew.
One other random comment I need to make is the lengths for the binding strips is written on the bodice pattern piece. And this minor detail is so extremely helpful I had to mention it. There is much debate in the pattern world about whether or not a pattern piece should be included for square or rectangular pieces vs just a measurement chart. I personally can’t be bothered to print a piece of paper just for a rectangle I can easily cut with my ruler and rotary cutter so I do prefer a measurement chart. But I love the fact I didn’t have to fish through the pattern instructions to look for the chart. It’s right on the pattern piece.
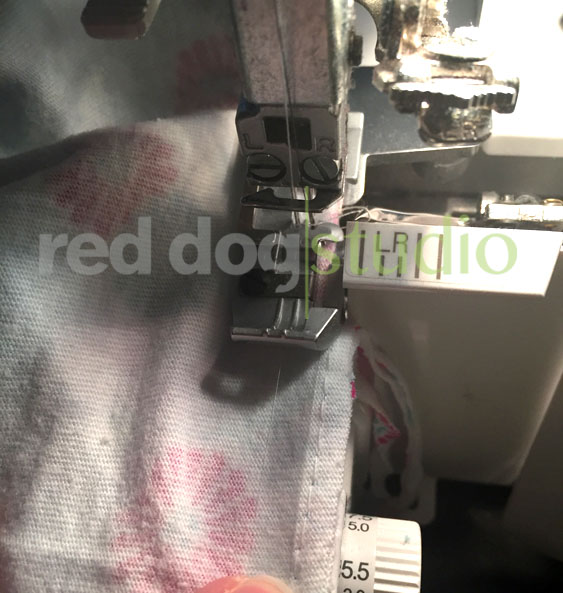
I want to note that I used a nice quality, heavier jersey for this dress. Because circle skirts take a good amount of fabric, there can be a bit of added weight to the bodice. So I sewed in a piece of clear elastic along the seam where the skirt attaches to the bodice as I was serging it on, just for a little added support and stabilization. You don’t stretch the elastic as you put it in but I’m not sure it would be needed for the tunic option or even a lighter weight jersey for that matter.
Fit
The chest size is the most important measurement to go by on this pattern. My daughter is in a size 5 in RTW clothing but only because she’s so long. Her chest measurements always put her in anywhere from 2T to 4T depending on the pattern designer. So what I normally do is make the width of the garment one size down from her RTW size but maintain the length of the RTW size. This is another reason I love making my kid’s clothes; instant customization.
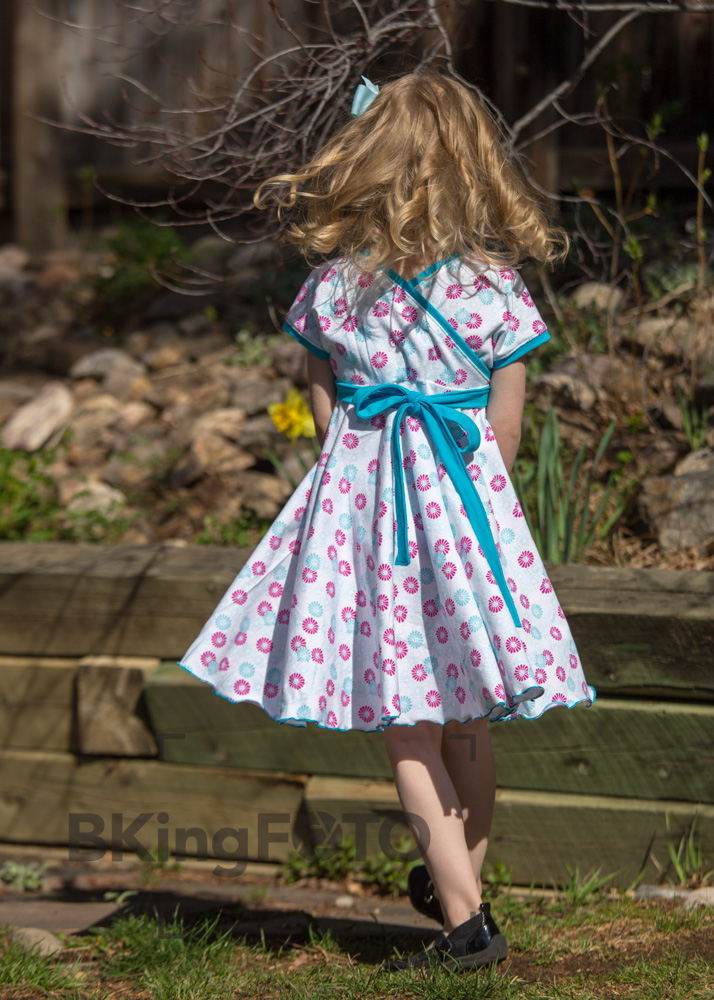
One thing I noticed is my daughter’s chest measurement made her a size 5 in this pattern and typically it’s at least one size down so I would caution to be extra vigilant about measuring the chest to get the right size. But this pattern was correct for her measurements going by the measurement chart and width at the bodice and length were both spot on. I did want to note since it’s not entirely evident in the listing, is that the front and back of the bodice are the same in that they both cross-over. There is no separate bodice back piece. It makes for a pretty back but I didn’t want anyone to be surprised.
Lastly, I have made a lot of cross-over style bodices where the way the cross over part attaches it makes a gap at the front. Or there’s a loose flap at the bottom where the raw edge of the under bodice is exposed. The way this is constructed leaves a nice, snug fit across the chest with no gaping.
Final Thoughts

My daughter loves to twirl and when she saw me come up from my studio with this dress she was so excited. I think adding the sash to this dress makes it so sophisticated and if you take one thing away from this post it’s that there was literally no effort to make this dress look amazing. I need to reiterate as well that this is the perfect pattern for beginners.
Click on photos for larger image. Photos courtesy of BKingFOTO.


Giveaway and Coupon Code!
Through the end of April 2015, use the code RedDogStudio25 for 25% off your order! 25%!!! Good at A Sparkly Baby’s Etsy shop. This is not an affiliate link and I do not receive compensation when someone uses this code.
Want to win your very own Easy Peasy Cross Over Dress!? Or any of the other A Sparkly Baby sewing patters?
Terms and Conditions:
-
-
- By entering this giveaway, an entrant is indicating his/her agreement to be bound by these terms and conditions.
- Open to US and International entrants.
- Entrant releases Facebook of any wrong doing. This promotion is in no way sponsored, endorsed or administered by, or associated with, Facebook or Rafflecopter.
- Grand Prize: One pattern of your choice from A Sparkly Baby’s pattern collection found in their Etsy shop.
- There is no entry fee and no purchase necessary to enter this giveaway.
- No cash alternative to the prizes will be offered.
- Winners will be notified by email provided through Rafflecopter. If response isn’t received within 24 hours a new winner will be chosen.
- Entrants are providing information to Red Dog Studio and not to Facebook or Rafflecopter.
- Giveaway opens Sunday, March 29, 2015 and closes Wednesday, April 1, 2015 at 10PM Mountain time.
- Void where prohibited by law.
-
Disclosure of Material Connection: I received one or more of the products or services mentioned above for free in the hope that I would mention it on my blog. Regardless, I only recommend products or services I use personally and believe will be good for my readers. I am disclosing this in accordance with the Federal Trade Commission’s 16 CFR, Part 255: “Guides Concerning the Use of Endorsements and Testimonials in Advertising.”